Assessor Training Tutorial
Module 1

Assessor Role & Assessment Mindset

Estimated review: 10 min · 2 source documents

01/ 10

SCI assessment is designed as a collaborative field review, not a pass/fail inspection conducted at arm's length. The assessor combines farmer context, direct observation, measurements, photos, and the current farm plan to build a defensible picture of current performance and next steps.

Five principles to carry into every visit

  1. Collaborative, not evaluative. Ask what the farmer sees, compare observations, and solve problems jointly.
  2. Visual field focus. Spend time in the field, use proven observation methods, and document evidence with photos.
  3. Dual-purpose efficiency. Coordinate soil sampling and assessment activities so one visit produces multiple required data points.
  4. Seasonal adaptation. Score what can reasonably be observed in the current season and distinguish current evidence from planned practices.
  5. Quantitative integration. Pair visual observations with measured results and soil-test data wherever available.

Pre-assessment preparation

  • Review farmer self-assessment and current farm plan.
  • Pre-populate known field IDs, engagement levels, and SHMP locations.
  • Plan representative field locations that include required SHMPs.
  • Confirm FarmLab access and mobile device GPS.
  • Print or download scorecards, rubric, and soil methodology.
Assessor standard: Separate observed today, measured today, farmer-reported history, and planned action. Do not treat them as interchangeable evidence.

Field kit

ShovelTarpTape measure6-in infiltration ringsWood block + malletClean plasticStopwatchSlake jars + meshWaterPenetrometerCamera/phoneFarmLabClipboard + pen
Knowledge check

Which statement best reflects the SCI assessor role?

Source materials

Download the documents for this section
Module 2

Assessor Qualifications, Training & Approval

Estimated review: 12 min · 1 source document

02/ 10

SCI-approved assessors must meet relevant qualification and competency expectations, complete SCI training and evaluation, demonstrate professional conduct and no conflict of interest, and maintain approval through annual calibration and continuing education.

Qualifications & core competencies

Applicants should have highly relevant experience for field work, documentation, and farmer communication. Examples include agronomists or soil scientists, professional soil health consultants, NRCS Technical Service Providers or Soil Conservationists, CCAs with regenerative/soil-health emphasis, EOV monitor training, or advanced-level SCI farmers with at least five years of local farming experience.

  • Soil observation skills
  • Plant and crop identification
  • Biodiversity observation
  • Field testing and technology proficiency
  • Clear, respectful communication
  • Ability to meet field-work physical requirements

Professional role & conduct

Farm assessments support compliance review and farmer transition work, but assessors do not make Verification decisions. Completed assessments are delivered to the approved third-party auditor and used with other evidence during the audit process.

  • Punctuality and reliability
  • Ethical behavior
  • Confidential handling of farm data
  • Clear communication with farmers and SCI
  • No conflict of interest for each assessed farm

Initial training program

1SCI program overview. One 2-hour session covering the SCI Farm Verification Standard and program structure.
2Assessment documents & protocols. One 3-hour in-depth training session.
3FarmLab training. One 1-hour instructional session on FarmLab and other relevant data-entry platforms.
4Evaluation. One 90-minute online evaluation covering information needed to conduct a full and professional SCI assessment.

Initial approval process

  1. Email SCI’s Verification Director for application materials.
  2. Submit application materials and register for training.
  3. Complete required trainings and submit the evaluation.
  4. If approved, complete the professional code of conduct, data privacy policy, conflict-of-interest attestation, and ethics attestation.
  5. Complete onboarding with the SCI team and begin receiving offers of assignment.

Annual recertification & continuing education

  • Complete a 1-hour Calibration Workshop with SCI staff.
  • Complete a 1-hour individualized interview with SCI staff.
  • When applicable, complete a 1-hour Standards Update & Review session.
  • Every 12 months, document at least 8 hours of relevant continuing education.
  • Within 15 months of initial approval, complete calibration, continuing-education evidence, and the re-approval interview.
Approval authority: SCI’s Verification Director has sole discretion to add individuals to, or revoke individuals from, the list of Approved Assessors.
Knowledge check

Who makes the final Verification decision?

Source material

Download the document for this section

Module 3

FarmLab Setup, Access & Data Readiness

Estimated review: 10 min · 1 source document

03/ 10

FarmLab is the required field data workflow described in the onboarding materials. Before entering the field, confirm that the assessor can access the correct farm, see the mapped boundaries and SHMP points, and record data on a GPS-enabled mobile device.

1Accept the invitation. Use the FarmLab invitation email and select New User if registering for the first time.
2Use consistent credentials. The desktop site and mobile app use the same account.
3Install the mobile app. Confirm GPS is enabled and the phone is fully charged.
4Verify data before travel. Open the farm and confirm field boundaries and sampling points are available.
5Read the methodology before sampling. FarmLab tells you where and where to record; the SCI methodology tells you how to perform the tests.
Do not begin sampling if required points or metadata fields are missing. Resolve the issue before collecting data so samples and observations are attached to the correct SHMP and depth.
Knowledge check

Before leaving reliable service, what should the assessor confirm?

Source materials

Download the documents for this section

Module 4

SHMP Layout & Soil Sampling Pattern

Estimated review: 15 min · 2 source documents

04/ 10

Soil Health Monitoring Points (SHMPs) are the repeatable anchor for SCI soil monitoring. The methodology uses geolocated locations so changes can be compared over time.

How SHMPs are allocated

The methodology states the number of SHMPs is based on enrolled acres and places SHMPs in the two predominant soil types.

Enrolled acresSHMPs
550 or less2
>550–1,2003
>1,200–2,2004
>2,200–3,5005
>3,500–5,1006
>5,100–6,9007
>6,900–9,0008
>9,000Contact SCI

Core sampling pattern

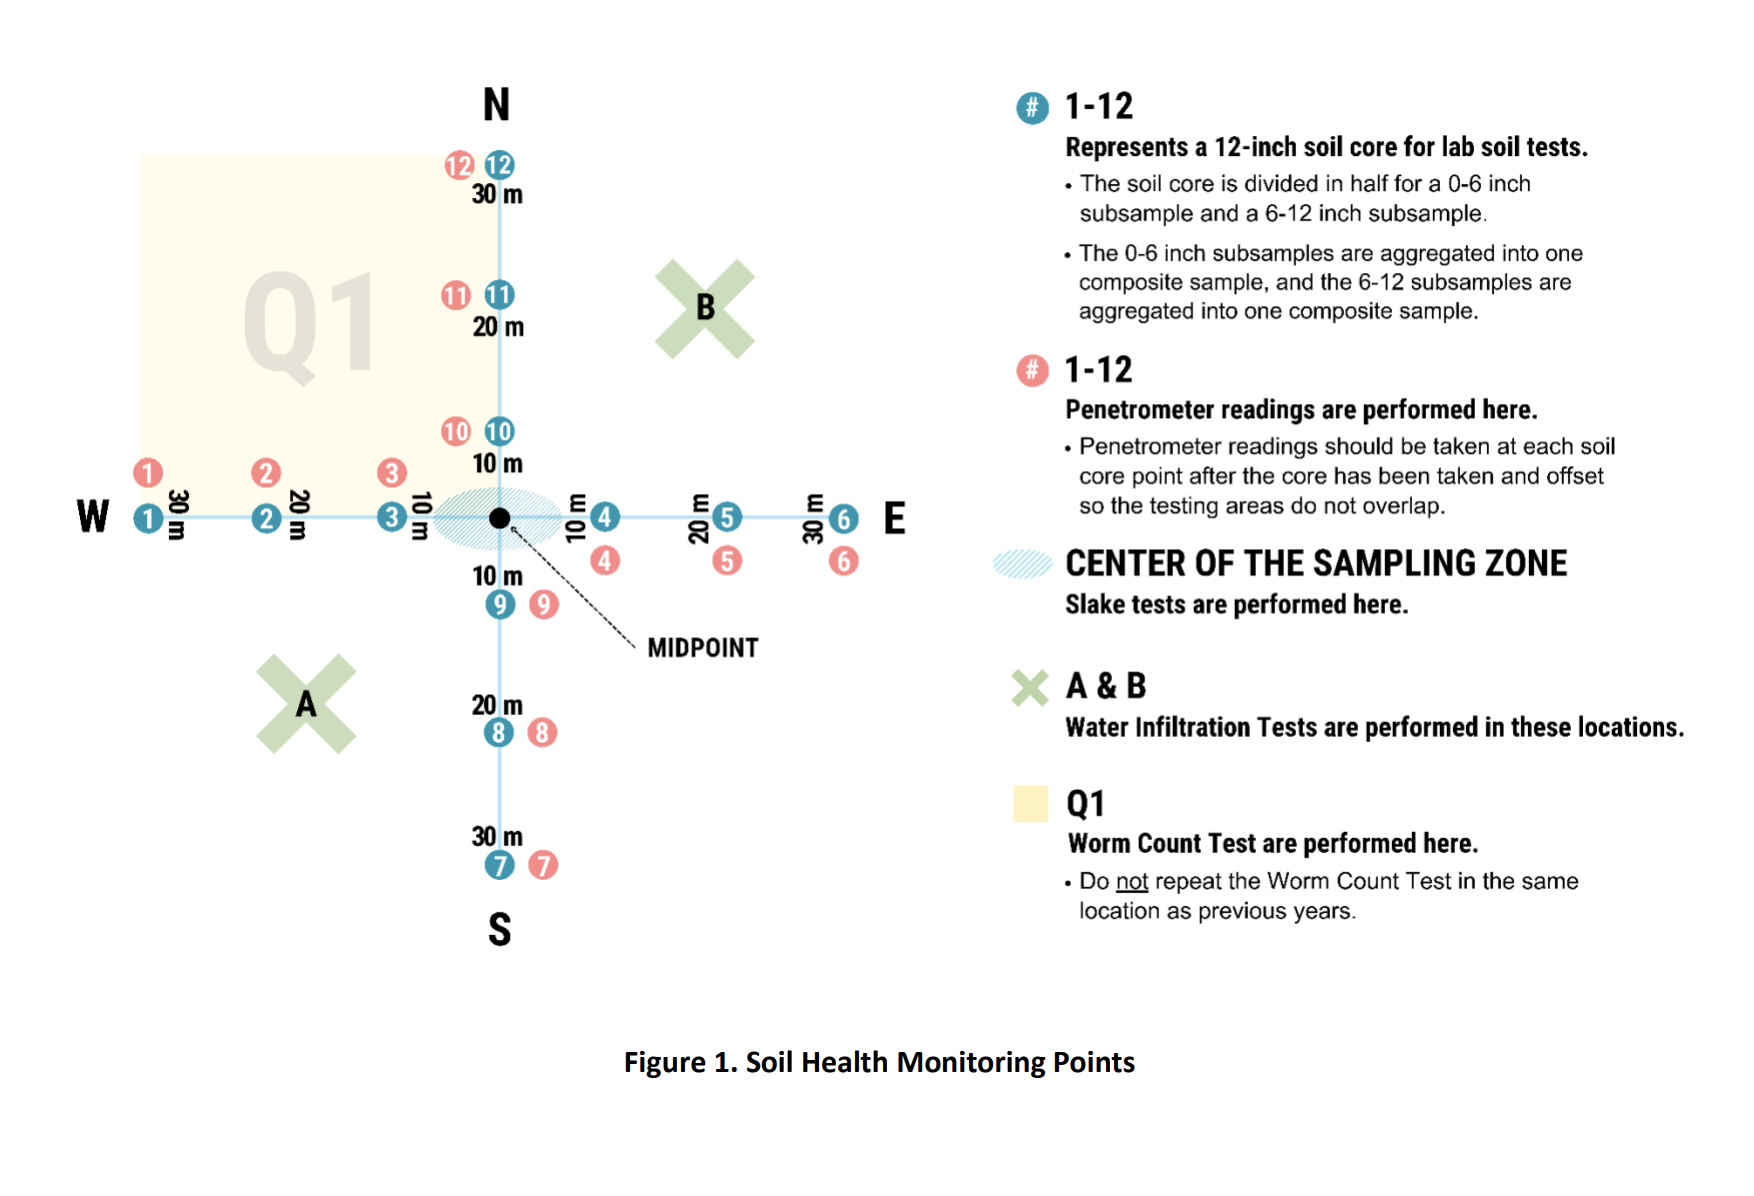
  • Navigate to the geolocated SHMP Midpoint.
  • Take soil cores at 10, 20, and 30 meters in each cardinal direction: N, S, E, W.
  • Each core is 12 inches deep.
  • Split each core into 0–6 in and 6–12 in.
  • Composite all 0–6 in material into one sample and all 6–12 in material into a second sample.
  • Take penetrometer readings within 0.5 m of each soil-core point, not in the exact core hole.

Where the annual field tests occur

SlakeTwo locations within the 10 m center/Midpoint area
Infiltration ASouth 20 m, West 20 m from Midpoint
Infiltration BNorth 20 m, East 20 m from Midpoint
Worm countQuadrant Q1; geolocate and avoid the exact same spot in subsequent years
PenetrometerWithin 0.5 m of each of the 12 core points
Frequency: The methodology says laboratory sampling occurs every three years while required field tests occur annually. Producers must be present for at least one-third of the Field Tests.
Knowledge check

How are the 12-inch soil cores handled?

Source materials

Download the documents for this section

Module 5

SHMP Monitoring Points Diagram

Visual reference · Soil sampling and field-test locations

05/ 10

Use this diagram as the visual field reference for the Soil Health Monitoring Point (SHMP) layout. It shows the 12 soil-core and penetrometer locations, the center sampling zone, water infiltration Sites A and B, and the Q1 worm-count area.

Figure 1. Soil Health Monitoring Points sampling layout
Field reference: Soil cores are collected at 10, 20, and 30 meters in each cardinal direction from the midpoint. Penetrometer readings are taken at the corresponding points after the core is removed and offset so the test areas do not overlap.
Knowledge check

Where are the 12 soil-core locations positioned in the SHMP layout?

Source materials

Download the documents for this section

Module 6

Required Field Tests & Evidence Collection

Estimated review: 20 min · 3 source documents

06/ 10

Field tests provide quantitative and visual evidence for the SHMP assessment. Conditions matter: moisture, temperature, residue, and test placement can materially affect what you observe, so document context in FarmLab.

Water infiltration

Conduct annually at designated Sites A and B. Drive a 6-inch ring into the soil, use the plastic-lined ring and a measured 450 mL of water, remove the plastic, and record infiltration time. The methodology calls for two readings and photo documentation.

Rubric anchors: Score 1 ≥30 min · Score 3 10–30 min · Score 5 <10 min

Worm count

In Q1, measure a 12 × 12 inch area, excavate to 12 inches, gently count worms, photograph evidence, return worms and soil, and geolocate the site. Moist soil and moderate temperatures produce more meaningful observations.

Rubric anchors: 0–1 worms/no castings = 1 · 2–3 = 3 · 4+ with abundant activity = 5

UPDATED METHOD

Slake test

Use one intact golf-ball-sized aggregate from each of two locations within the Midpoint. Place on mesh, immerse, start the timer immediately, observe undisturbed for exactly 5 minutes, estimate percent remaining, and photograph with the timer visible.

Updated rating: 0–10% Very Poor · 10–30% Poor · 30–60% Moderate · 60–85% Good · 85–100% Excellent

Penetrometer

At each of 12 core points, test within 0.5 m of the core location. Zero the gauge, clear surface debris, insert vertically, push until 300 psi, record penetration depth, and photograph the distance. Deeper penetration indicates less compaction.

Rubric anchors: <4 in = 1 · 4–6 in = 3 · >6 in = 5

Protocol precedence: The standalone Updated Slake Test Section changes the slake result from “time to complete slaking” to “percent aggregate remaining after exactly 5 minutes.” Use the updated section when conducting and training on the slake test.

FarmLab evidence standard

  • Enter field-test results under the correct SHMP and correct sample-depth menu.
  • Scan the 0–6 in sample barcode; if no barcode exists, use Generate and write the generated barcode on the bag.
  • Upload required photos under Images, including field-test evidence and weather screenshots when used.
  • Record weather/conditions as metadata because they affect interpretation and renewal comparability.
Knowledge check

Under the updated Slake Test Section, what is the recorded endpoint?

Module 7

SHMP-Level Assessment & Scoring

Estimated review: 20 min · 3 source documents

07/ 10

The SHMP scorecard organizes field-level evidence for Pillars 1–4. The assessor script is a prompt guide; the scorecard is the paper record; the rubric supplies score anchors.

P1

Soil Disturbance

Record soil structure, compaction, average penetration depth at 300 psi, aggregate stability, infiltration results, tillage evidence, traffic patterns, compaction concerns, and planned reduction strategies.

P2

Living Roots

Score active root system, photosynthetic coverage, and cover crop contribution. Record coverage types and quality: distribution, thickness, stability, decomposition, root-soil interaction, and timing for continuous living roots.

P3

Soil Coverage

Score bare soil percentage and coverage effectiveness. Document residue, cover crop residue, mulch, early plantings, living weeds, causes of bare areas, and planned seasonal improvements.

P4

Biodiversity

Document cover crop species, beneficial insects, wildlife evidence, functional plant groups, worm counts/channels/castings, and action elements showing success. Score field biodiversity and combined biological activity.

Rubric anchors

1Low / poor evidencee.g., dense/platy structure; <4 in compaction depth; >40% bare soil
3Moderate / mixedUse the middle anchor when evidence genuinely fits the stated moderate range.
5Strong / excellent evidencee.g., granular structure; >6 in compaction depth; <20% bare soil
Legacy scorecard caution: The supplied SHMP scorecard still contains fields for “time to complete slaking.” The separate Updated Slake Test Section is newer and specifies percent remaining after exactly 5 minutes. Follow the updated test protocol and clearly document the current result so the record does not imply the legacy timing method was used.
Knowledge check

Which item belongs on the SHMP-level scorecard rather than only the farm-level scorecard?

Module 8

Farm-Level Assessment: Biodiversity, Inputs & Livestock

Estimated review: 20 min · 3 source documents

08/ 10

The farm-level assessment captures whole-farm evidence not confined to a single SHMP. The supplied materials focus this review on Pillars 4, 5, and 7.

P4

Biodiversity

Identify required action elements by engagement level (Level I=1, II=2, III=3, IV=4). For each element record visible, not visible, or planned status, planned date if applicable, wildlife observed, and totals implemented/functioning, not visible, and planned.

P5

Input Management

Review herbicides, weeds, insecticides/fungicides, synthetic fertilizers/N, organic or OMRI-listed controls, prior-season pest/disease challenges, IPM strategies and reductions, current-season improvements, target reductions, and observable evidence such as injury, weed pressure, natural pest-control support, or application equipment changes.

P7

Livestock Integration

Mark not applicable when there is no livestock. Otherwise assess outdoor access, shelter/shade/water, body condition, rotational grazing, stocking density, pasture recovery, ≥80% vegetative cover, traffic management, manure distribution, and riparian/wetland protection.

Farm-level context to record first

Farm nameDateAssessorWeatherRainfall YTDAverage annual rainfall
Planned is not visible. The scorecard deliberately separates “Visible,” “Not Visible,” and “Planned (Date).” Keep this distinction in both notes and any later transcript summary.
Knowledge check

How should a biodiversity element that is not currently present but has a defined implementation date be recorded?

Module 9

Data Entry, Sync, Samples & Shipping

Estimated review: 10 min · 2 source documents

09/ 10

The assessment is not complete until the field record is synchronized and the physical samples are handled correctly.

1Finish each point. Confirm barcode, results, metadata, and required images are entered under the correct sample/SHMP.
2Return to connectivity. In reliable Wi-Fi/mobile service, use Settings → Refresh Farm and Sample Data, then Data Sync. Do not log out before syncing.
3Notify SCI. The setup guide instructs the sampler to email SCI after sampling is completed.
4Freeze samples. Keep soil samples frozen until ready to ship.
5Package completely. Use the lab-addressed packaging, apply the provided FedEx label, and include the FarmLab submittal form.
6Ship early in the week. Ship Monday, Tuesday, or Wednesday, preferably with morning pickup, to avoid weekend transit/storage and support arrival within two days.
Common failure mode: Leaving the field with unsynchronized data, unlabeled samples, or photos attached to the wrong depth/sample menu can make an otherwise well-executed visit difficult to validate.
Knowledge check

When do the setup instructions recommend shipping soil samples?

Source materials

Download the documents for this section

Module 10

End-to-End Assessor Workflow & Readiness

Estimated review: 15 min · 11 source documents

10/ 10

Use this workflow as the final field-ready sequence. It combines the principles, sampling methodology, scripts, scorecards, and FarmLab instructions into one operating routine.

01

Prepare

Review farm plan/self-assessment, engagement information, SHMP map, seasonal conditions, and required equipment.

02

Open FarmLab

Confirm correct farm, boundaries, SHMP points, GPS, and data-entry screens before sampling.

03

Start farm-level context

Record farm name, date, assessor, weather, rainfall context, and begin whole-farm observations.

04

Navigate to SHMP

Mark the Midpoint and follow the prescribed core and field-test layout.

05

Collect lab samples

Take 12 cores, split 0–6 and 6–12 inches, composite by depth, barcode and label correctly.

06

Perform annual field tests

Infiltration, worm count, updated slake, and penetrometer at their designated locations; document evidence and conditions.

07

Complete SHMP assessment

Use the SHMP script, scorecard, and rubric for Pillars 1–4. Preserve measurements exactly in the transcript.

08

Complete farm-level assessment

Evaluate Pillars 4, 5, and 7 using the farm-level script and scorecard. Separate visible, not visible, and planned.

09

QA/QC before leaving

Check missing scores, notes, photos, barcode/depth assignment, weather metadata, and planned dates.

10

Sync & ship

Synchronize in service, freeze samples, package with submittal form, and ship early in the week.

Final field-ready checklist

  • I can explain the five SCI assessment principles.
  • I can locate the Midpoint, 12 core points, infiltration sites, Q1 worm area, and penetrometer locations.
  • I know the 0–6 in and 6–12 in samples remain separate composites.
  • I will use the updated 5-minute percent-remaining slake protocol.
  • I can distinguish SHMP-level scoring from farm-level scoring.
  • I can use scores 1, 3, and 5 as rubric anchors and document evidence supporting the selected score.
  • I know where FarmLab photos, metadata, and barcodes belong.
  • I will complete a QA/QC review before leaving the farm and again before syncing/shipping.
Knowledge check

Which sequence best represents the full workflow?

Reference library

All source documents

Download any original PDF used in this tutorial. Section-specific downloads also appear at the end of every training module.